A really great centrepiece for any garden party is a pig or hog spit roast. If you want something a little more impressive than your standard back yard bbq grill, this is a great option, it's fantastic for big parties or family occasions, the look and smell of pork slowly roasting over an open fire is pretty hard to beat. But it's also practical if you have a lot of mouths to feed, one good size pig will feed dozens of people.
When it comes to pig roasters and indeed homemade bbq's in general, the sky is the limit. You can pay thousands of dollars to purchase a store bought version with plenty of features, and it has to be said some of the store bought models are pretty impressive to behold! But if you're the kind of person that will get more satisfaction out of sitting back with a beer watching your pig roast on something you've built yourself then the homemade option is for you, not to mention a hell of a lot cheaper.
There are three basic elements to constructing your oil drum pig roaster; the first is the drum itself, the next is the supporting frame or stand and the third is the rotisserie or shaft onto which the pig is mounted. Free pig roaster plans are actually quite hard to find on the net, so I will describe a relatively basic design that is pretty simple and cheap to construct. It's worth noting here that your only limit is your imagination and ambition, the basic principles are outlined here along with a neat little design, but you can scale this up to whatever you like, I like to use a 55-gallon drum, but I've seen 250 and even 500 gallon oil and fuel tanks used that you could almost roast a buffalo on!!
ADVERTISEMENT
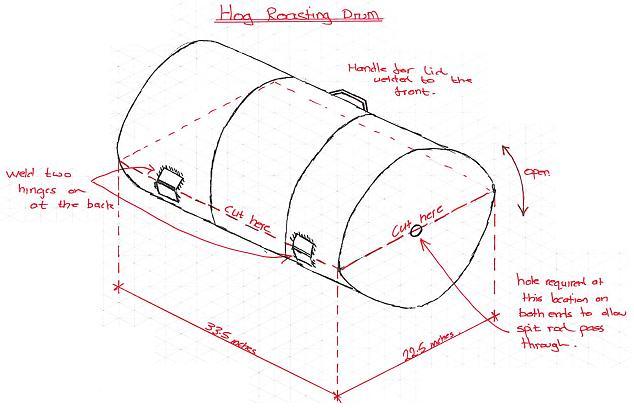
Ok so lets get down to it, you're probably thinking 'what do I need?' first up, the drum. A good starting point is the standard 55 gallon fuel oil drum, these are usually pretty easy to come across, but if you can, try and get your hands on one that hasn't been storing toxic waste for the past fifty years!! Foodstuffs such as cooking oils and syrups are often stored in these drums so ideally you might be able to get one of these. If you're finding it difficult to source a drum with a 'clean' background, don't worry, the first thing you will do with your finished pig roaster is light a couple of really hot fires in it to burn off any residual contaminants. The 55-gallon drum dimensions are approximately 22.5 inches in diameter and 33.5 inches high, plenty of room for a small to medium sized pig.
The first operation is to cut the drum in half, such that you're cutting through the top and bottom ends of the drum. For this you will need an angle grinder of some description. If your drum has been used to store flammable liquids be careful as the sparks from the grinder may ignite any residue in the drum. After the drum is halved, you will need to attach two steel brackets to the drum to allow the top half close down over the bottom half creating a closable lid, they can be connected with rivets or welded, I recommend welding as the rivets have a tendency to work loose with time. A lid is of course optional, but if your bbq parties are as prone to a rain shower as mine tend to be, a lid is essential!
In the bottom segment of the drum, drill about 20 half-inch diameter ventilation holes distributed along the length of the drum. A source of oxygen to the charcoal is essential for this to work. Some folks like to fabricate up small sliding doors for the base of their roaster to regulate air flow, this in theory is a great idea, but I find I do just fine with simple drill holes. After this you need to create a grate in the lower drum half (the half you drilled the vent holes in) for the charcoal to sit on. This is pretty straightforward, just cut a rectangle roughly 16 inches by 30 inches to sit into the drum, it will wedge itself against the sides of the drum. Standard extruded metal sheet you may have around the yard is fine for this, alternatively you'll pick it up in the local hardware store.
Finally just attach a handle to the lid, by bending a small piece of flat steel into shape and welding it on. An optional but worthwhile addition is a steel prop to hold your pig roaster lid open (similar to the hood of your car) while you're placing the rotisserie. This will take extra stress off the hinge locations reducing fatigue cracking in the drum steel.
The Frame
The next element to tackle is the supporting steel frame. You have plenty of options here, those of you that scale this idea up, might think about mounting your pig roaster on a small trailer, allowing you to pull the roaster along the road, from venue to venue, but for the purposes of this guide, we'll work on the more modest version and assume it will be staying in your back yard.
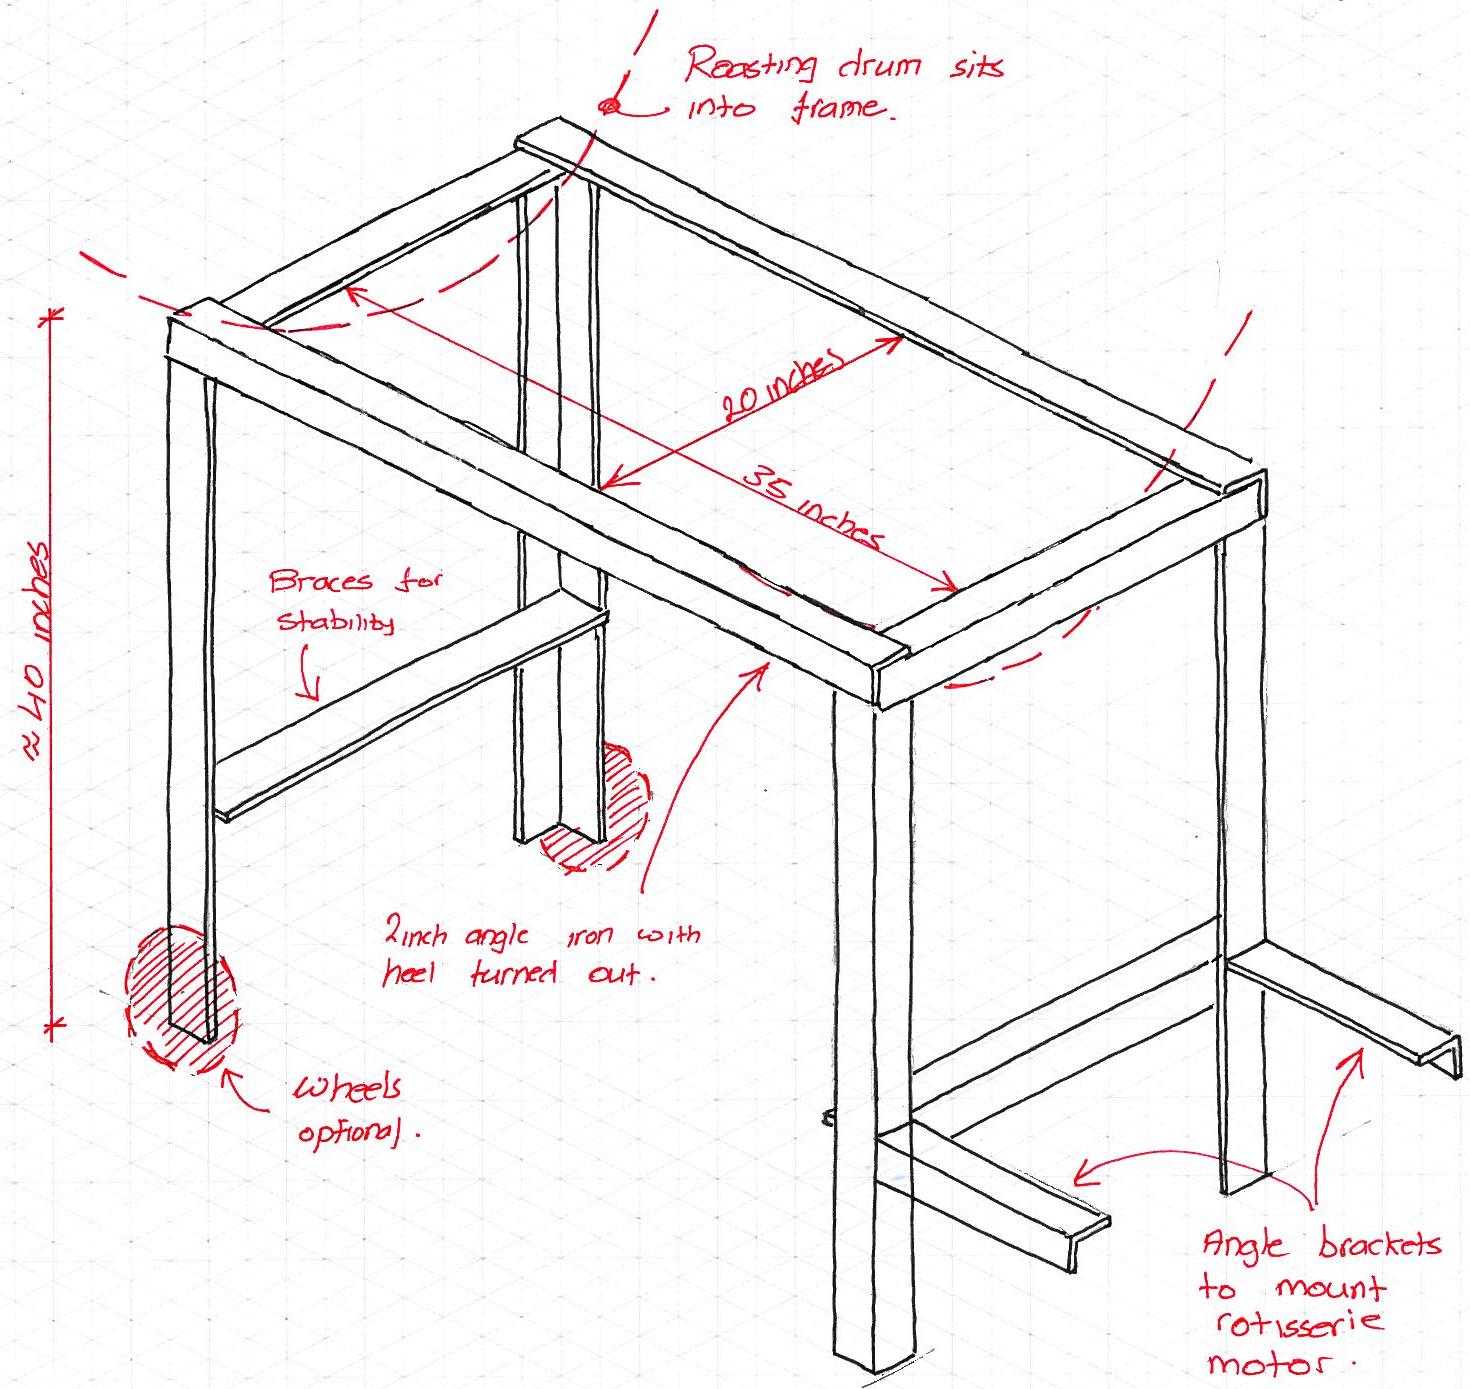
The frame is basically a rectangle that sits onto four legs, into which the 55-gallon drum sits. I find the most robust way to construct this is from light angle iron, approximately 2-inch works best. First you need to weld the rectangular 'table-top' section for the drum to sit in, weld this up with internal dimensions of approximately 20 inches by 35 inches with the heel of the angle facing out for neatness.
Next weld on the legs, four lengths of the same 2 inch angle iron will do fine, The height is up to you, I find I like to have my tabletop level at about 40 inches off the ground, that's just a personal preference of mine. When you have welded on the four legs you will need to add a little bracing just to stiffen to whole thing up. Half way down the length of the legs, weld two additional crosspieces along the narrow side of the frame, just to take any wobble out of the structure, especially if you made your tabletop higher than 40 inches. Finally just sit the drum into the open rectangular tabletop, if you've measured correctly is should fit snugly down into the frame. If you don't intend on dismantling your pig roaster while it's stored away, you can put a couple of spot welds down, to hold the drum in place in the frame. That's the basics of the frame, you can elaborate on this as much as you like by welding in additional brackets to make workspace around the roaster, possibly for your knives or basting brushes or maybe incorporating castor wheels to make the drum into a portable wagon, so moving the roaster around is a little easier. I'll leave the detail of that up to you.
The Rotisserie
The last of the three elements is the rotisserie, it's probably the most important feature when it comes to roasting your pig, it also fantastic to see the pig slowly turning, getting browner and browner with the passing hours. So again you have options here, you can go automated or manual, by this I mean you can rig up a small motor to rotate your pig on the spit or you can just put a hand crank on the end of your spit and turn it yourself.
While I have seen the hand crank used, I can't recommend it, the maintenance required during cooking is just too high, especially if your roasting a larger animal with a much longer roasting time, so invest a little extra effort now and rig up a small electric motor to do the hard work. Any small electric motor works fine, once its geared down to about one or two RPM, the slower the turn the nicer the roast. I use a one inch steel bar for my spit, its probably where you will spend money on this project, because your not likely to find one lying around. A word of caution here, don't go for cheaper galvanised bar, the coating can come off in the heat due to the expansion and contraction of the rod.
The steel spit rod can be mounted along the diameter line of the barrel, you will need to rig up a couple of steel casters for the rod to bear onto to reduce the friction on the turning bar, otherwise you risk overloading your motor. I tend to mount my motor at low level on a small angle iron shelf constructed off the main frame, then you can use a pulley to run up to the spit rod. You will need to have a removable pulley on your spit rod to allow you to mount the pig in the roaster, then attach your pulley and belt to the motor. There isn't a lot of point in me going into the exact mounting of the motor and pulleys etc. because you will all come up with a different arrangement based on what you have to hand, but the basic principle is there.
Summary
So that's the blueprint in a nutshell, just to summarize the main points, air flow up under the charcoal is essential, if you find your struggling with the charcoal, more ventilation is probably required so get that drill out again. Stiffening up the steel frame legs is important, especially is you scale up to a bigger roaster taking heavier animals. When it comes to the rotisserie, go the automatic rout, it makes for a much better roasting experience all round, for the chef and the diners! The last suggestion I would make is this, you have gone through a lot of effort in making your roaster, so go that extra mile and smarten it up with a lick of heat resistant paint, it will make the world of difference, and make a collection of what looks like welded scrap metal look like a respectable high end roaster!
A simple alternative to the deign outlined above is basically to cut your drum in half as described above and weld the two halves end to end, with the dividing wall cut out of the middle, this will double your roasting length, although you won't have a lid, unless of course you have two 55-gallon drums to play with!!
That's it, the talking is over, get out there and hunt down some drums and start building, experiment and use your imagination, it ALWAYS leads to the best results!! Happy Roasting!!